

[2026] CKAD Dumps are Available for Instant Access
Valid CKAD Dumps for Helping Passing CKAD Exam!
NEW QUESTION # 24
You must connect to the correct host . Failure to do so may result in a zero score.
[candidate@base] $ ssh ckad00021
Task
Create a Cronjob named grep that executes a Pod running the following single container:
name: busybox
image: busybox:stable
command: ["grep", "-i", "nameserv
er", "/etc/resolv.conf"]
Configure the CronJob to:
* execute Once every 30 minutes
* keep 96 completed Job
* keep 192 failed Job
* never restart podsterminate pods after 8 seconds
Manually create and execute once job
named grep-test from the grep Cronjob
Answer:
Explanation:
See the Explanation below for complete solution.
Explanation:
ssh ckad00021
Below is the clean, CKAD-friendly way (YAML + apply + verify + manual job).
1) Create the CronJob grep
Create a file (anywhere, e.g. in your home):
cat <<'EOF' > grep-cronjob.yaml
apiVersion: batch/v1
kind: CronJob
metadata:
name: grep
spec:
schedule: "*/30 * * * *"
successfulJobsHistoryLimit: 96
failedJobsHistoryLimit: 192
jobTemplate:
spec:
activeDeadlineSeconds: 8
template:
spec:
restartPolicy: Never
containers:
- name: busybox
image: busybox:stable
command: ["grep", "-i", "nameserver", "/etc/resolv.conf"]
EOF
Apply it:
kubectl apply -f grep-cronjob.yaml
Verify:
kubectl get cronjob grep
kubectl describe cronjob grep
Confirm the key fields quickly:
kubectl get cronjob grep -o jsonpath='{.spec.schedule}{"\n"}{.spec.successfulJobsHistoryLimit}{"\n"}{.spec.
failedJobsHistoryLimit}{"\n"}'
kubectl get cronjob grep -o jsonpath='{.spec.jobTemplate.spec.activeDeadlineSeconds}{"\n"}{.spec.
jobTemplate.spec.template.spec.restartPolicy}{"\n"}'
2) Manually create and execute the one-off Job grep-test from the CronJob Create the Job from the CronJob:
kubectl create job --from=cronjob/grep grep-test
Watch it:
kubectl get jobs grep-test
kubectl get pods -l job-name=grep-test
Get logs (most important proof):
POD=$(kubectl get pods -l job-name=grep-test -o jsonpath='{.items[0].metadata.name}') kubectl logs "$POD" You should see one or more nameserver ... lines from /etc/resolv.conf.
NEW QUESTION # 25
You have a Deployment named 'frontend-deployment that runs a frontend application. This deployment is configured to use a ' StatefulSet for its backend service. However, during a recent update, the update process for the 'StatefulSet failed. You need to understand how this failure mignt have impacted the deployment and the frontend application. Explain tne possible causes of this failure and how it might have affected the frontend service.
Answer:
Explanation:
See the solution below with Step by Step Explanation.
Explanation:
Solution (Step by Step) :
The failure of a StatefulSet update can have significant repercussions for the 'frontend-deployment and its frontend application. Let's analyze the possible causes and their impact
1. Persistent Volume Provisioning Issues:
- StatetulSets rely on persistent volumes to maintain data and state across pod restarts.
- If the persistent volume provisioning fails, the pods in the StatefulSet might be unable to access their persistent volumes, causing application errors.
2. StatefulSet Pod Update Errors:
- If the update process for the StatefulSet pods encounters errors during the update, like image pull failures or container startup issues, the update might fail, leading to partially updated pods or even the removal of existing pods.
3. StatefulSet Pod Termination Issues:
- StatetulSets use a strict update strategy where pods are terminated in sequence based on their ordinal numbers.
- If the termination of a specific pod fails, tne update process will be interrupted, leaving the StatefulSet in a partially updated state. Impact on the Frontend Application:
- Data Loss: If the StatefulSet's persistent volume provisioning fails, the backend service might lose data, leading to data inconsistencies and potential loss for the frontend application.
- Service Interruptions: The frontend application might experience service interruptions due to the backend service becoming unavailable or partially functional during the StatefulSet update failure-
- Functionality Degradation: If the StatefulSet update process results in partially updated pods, the frontend application might encounter degraded functionality or erratic benavior Troubleshooting:
- Examine the ' StatefulSet' and its pod logs for error messages.
- Check the persistent volume provisioning status and ensure the volumes are correctly mounted to the pods.
- Analyze the pod events for any failures during the update process.
NEW QUESTION # 26 
Context
A container within the poller pod is hard-coded to connect the nginxsvc service on port 90 . As this port changes to 5050 an additional container needs to be added to the poller pod which adapts the container to connect to this new port. This should be realized as an ambassador container within the pod.
Task
* Update the nginxsvc service to serve on port 5050.
* Add an HAproxy container named haproxy bound to port 90 to the poller pod and deploy the enhanced pod.
Use the image haproxy and inject the configuration located at /opt/KDMC00101/haproxy.cfg, with a ConfigMap named haproxy-config, mounted into the container so that haproxy.cfg is available at
/usr/local/etc/haproxy/haproxy.cfg. Ensure that you update the args of the poller container to connect to localhost instead of nginxsvc so that the connection is correctly proxied to the new service endpoint. You must not modify the port of the endpoint in poller's args . The spec file used to create the initial poller pod is available in /opt/KDMC00101/poller.yaml See the solution below.
Answer:
Explanation:
Explanation
Solution:
apiVersion: apps/v1
kind: Deployment
metadata:
name: my-nginx
spec:
selector:
matchLabels:
run: my-nginx
replicas: 2
template:
metadata:
labels:
run: my-nginx
spec:
containers:
- name: my-nginx
image: nginx
ports:
- containerPort: 90
This makes it accessible from any node in your cluster. Check the nodes the Pod is running on:
kubectl apply -f ./run-my-nginx.yaml
kubectl get pods -l run=my-nginx -o wide
NAME READY STATUS RESTARTS AGE IP NODE
my-nginx-3800858182-jr4a2 1/1 Running 0 13s 10.244.3.4 kubernetes-minion-905m my-nginx-3800858182-kna2y 1/1 Running 0 13s 10.244.2.5 kubernetes-minion-ljyd Check your pods' IPs:
kubectl get pods -l run=my-nginx -o yaml | grep podIP
podIP: 10.244.3.4
podIP: 10.244.2.5
NEW QUESTION # 27
Exhibit:
Task
You are required to create a pod that requests a certain amount of CPU and memory, so it gets scheduled to-a node that has those resources available.
* Create a pod named nginx-resources in the pod-resources namespace that requests a minimum of 200m CPU and 1Gi memory for its container
* The pod should use the nginx image
* The pod-resources namespace has already been created
- A. Solution:


- B. Solution:
Answer: A
NEW QUESTION # 28 
Set Configuration Context:
[student@node-1] $ | kubectl
Config use-context k8s
Context
A web application requires a specific version of redis to be used as a cache.
Task
Create a pod with the following characteristics, and leave it running when complete:
* The pod must run in the web namespace.
The namespace has already been created
* The name of the pod should be cache
* Use the Ifccncf/redis image with the 3.2 tag
* Expose port 6379
Answer:
Explanation:
See the solution below.
Explanation:
Solution:
NEW QUESTION # 29
You have a Kustomization file that uses a resource patch to modify the deployment of an Nginx service. The patch uses the field to set the CPLJ request for the container to 500m. However, you've noticed that this patch is no longer working as expected. You've been informed that the field has been deprecated and replaced with a new field structure in newer Kubernetes API versions. Explain how to update the Kustomization file to accommodate this change, ensuring compatibility with both older and newer Kubernetes versions.
Answer:
Explanation:
See the solution below with Step by Step Explanation.
Explanation:
Solution (Step by Step) :
1. Identify tne New Field Structure: Research the updated field structure for container resource definitions in the newer Kubernetes API version. The new structure likely utilizes nested resource fields for each container, like instead of a flat structure.
2. Update the Kustomization Patch: Modify the resource patch in your Kustomization file to use the updated field structure. If the newer field structure is 'spec-template-spec-containers[l.resources.requests.cpu' , update your patch accordingly. This could involve changing the patch's path or using a different patch strategy, such as a strategic merge patch.
3. Consider Conditional Patches: If you need to support both older and newer Kubernetes versions, utilize conditional patches in your Kustomization file. This allows you to apply different patcnes based on the Kubernetes API version detected. You can use Kustomize's 'patchJson6902' strategy With a conditional statement to apply the correct patch depending on the API version.
4. Test the Updated Kustomization: Deploy your Kustomization to a cluster running both older and newer Kubernetes versions. Validate that the CPU requests are correctly applied to the Nginx deployment containers in each version. Verify that the patcnes are being applied appropriately based on the detected Kubernetes API version. 5. Document Changes: Ensure that the updated Kustomization file and any conditional logic are well-documented to prevent future confusion or errors when deploying to different Kubernetes environments. By following these steps, you can successfully update your Kustomization file to accommodate the deprecated field structure and ensure compatibility with different Kubernetes API versions. This will allow you to manage and configure your deployments effectively, even as Kubernetes evolves.
NEW QUESTION # 30
You need to implement a mechanism for automatically rolling out new versions of your application pods. This process should be triggered by a change in tne application's container image tag in a Docker Hub repository.
Answer:
Explanation:
See the solution below with Step by Step Explanation.
Explanation:
Solution (Step by Step) :
1. Configure the Deployment for Rolling Updates:
- IJpdate your application deployment to specify a 'rollinglJpdate' strategy
- Set 'maxunavailable' and 'maxSurge' to control the rolling update process-
- Include a 'strategy.type' to 'Rollingupdates
- Set ' imagePullPolicy' to 'Always' to ensure that new images are always pulled from the Docker Hub repository.
2. Apply the Deployment: - Apply the updated deployment using 'kubectl apply -f your-application-deployment-yamr 3. Push a New Image to Docker Hub: - UPdate your application's container image in the Docker Hub repository and push the new image With a different tag. For example, update the tag from "latest to 'v2'. 4. Monitor the Deployment: - Observe the rolling update process using 'kubectl get pods -l app=your-application'. You should see new pods with the updated image being created and old pods being terminated. 5. Verify the Update: - Once the rolling update is complete, use 'kubectl describe deployment your-application-deployment to verify that the 'updatedReplicas' field matches the 'replicas' field. This confirms that the update was successful. ,
NEW QUESTION # 31
You are deploying a new microservice called 'payment-service' that requires access to a confidential data volume mounted at /sensitive- data'. This volume is mounted as a Secret in Kubernetes. The 'payment-service' container should only be allowed to access this volume. You need to configure the PodSecurityPolicy to enforce this access restriction.
Answer:
Explanation:
See the solution below with Step by Step Explanation.
Explanation:
Solution (Step by Step) :
I). Create a PodSecurityPoIicy:
- Create a YAML file for your P0dSecurityP01icy.
- Define the 'apiVersion' and 'kind'
- Add a 'metadata' section with a unique name for the policy (e.g., 'payment-service-psp').
- In the 'spec' section:
- Set 'runAsUser' to ' RunAsAny' to allow any user ID.
- Set readOnlyRootFilesystem' to 'talse' to allow modifications within the container.
- Set 'hostNetworR to 'false' to avoid using the host's network.
- Set 'allowPrivilegeEscalatiorU to 'false' to prevent privilege escalation.
- In the 'volumes' sectiom
- Define 'hostPath' as the allowed volume type with the specified path "Isensitive-data'
2. Apply the PodSecurityPolicy: - Use ' kubectl apply -f payment-service-psp.yamr to create the PodSecurityPoIicy in your cluster. 3. Create a ServiceAccount: - Create a new ServiceAccount tor the 'payment-service deployment. - Apply the ServiceAccount YAML file using 'kubectl apply -f payment-service-sa_yamr 4. Bind the PodSecurityPolicy to the ServiceAccount: - Create a RoleBinding to bind the 'payment-service-psp' to the 'payment-service' ServiceAccount - Apply the RoleBinding YAML file using "kubectl apply -f payment-service-rb.yaml'
5. Deploy the Payment Service: - Create the 'payment-service' Deployment configuration. - Specify the 'payment-service' ServiceAccount in the field. - Define the 'volumeMount tor the 'sensitive-data' volume and specify the corresponding 'volume' in the 'volumes' section. - Ensure the volume is mounted as a Secret from the 'default' namespace.
- The PodSecurityPolicy restricts the benavior of pods and their containers. - 'runAslJser' , 'readOnlyRootFilesystem', 'hostNetwork' , and sallowPrivilegeEscalation' define various security constraints for the container. - The 'volumes' section specifies allowed volume types (e.g., 'hostPath') and paths. - The ServiceAccount binds the PodSecurityPolicy to the deployment. - The ROIeBinding assigns the PodSecurityPolicy to the ServiceAccount, effectively enforcing the specified constraints. This configuration ensures that only the payment-service' deployment can access the confidential data volume mounted as a Secret in Kubernetes.
NEW QUESTION # 32
You need to implement a mechanism for automatically rolling out new versions of your application pods. This process should be triggered by a change in tne application's container image tag in a Docker Hub repository.
Answer:
Explanation:
See the solution below with Step by Step Explanation.
Explanation:
Solution (Step by Step) :
1. Configure the Deployment for Rolling Updates:
- IJpdate your application deployment to specify a 'rollinglJpdate' strategy
- Set 'maxunavailable' and 'maxSurge' to control the rolling update process-
- Include a 'strategy.type' to 'Rollingupdates
- Set ' imagePullPolicy' to 'Always' to ensure that new images are always pulled from the Docker Hub repository.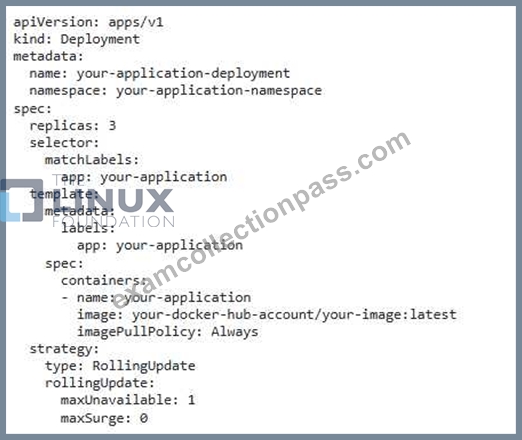
2. Apply the Deployment: - Apply the updated deployment using 'kubectl apply -f your-application-deployment-yamr 3. Push a New Image to Docker Hub: - UPdate your application's container image in the Docker Hub repository and push the new image With a different tag. For example, update the tag from "latest to 'v2'. 4. Monitor the Deployment: - Observe the rolling update process using 'kubectl get pods -l app=your-application'. You should see new pods with the updated image being created and old pods being terminated. 5. Verify the Update: - Once the rolling update is complete, use 'kubectl describe deployment your-application-deployment to verify that the 'updatedReplicas' field matches the 'replicas' field. This confirms that the update was successful. ,
NEW QUESTION # 33
You have a microservice application that relies on a Redis cacne for data retrieval. Design a multi-container Pod that incorporates a Redis sidecar container to provide local caching within the Pod. Ensure that the main application container can access the Redis sidecar container within the same Pod Namespace Without needing to communicate with an external Redis cluster.
Answer:
Explanation:
See the solution below with Step by Step Explanation.
Explanation:
Solution (Step by Step) :
1. Define the Pod YAML: Create a Pod YAML file that includes both the main application container and the Redis sidecar container.
2. Configure Environment Variables: Set an environment variable 'REDIS HOST within the main application container to point to the Redis sidecar containers hostname- In Kubernetes, containers within the same Pod can communicate with each other using their container names. 3. Connect Application to Redis: Modifry' the application code to connect to the Redis instance using the 'REDIS HOST environment variable. For example, using a Python application with the 'redis-py' library: python import redis r = redis-Redis(host=os.environ.get('REDlS_HOST'), port=6379) # Perform Redis operations (e.g., r.set('key', 'value')) 4. Deploy the Pod: Apply the Pod YAML using 'kubectl apply -f my-app-pod.yamr 5. Verify Connectivity: Check the logs of the main application container to ensure it's successfully connecting to the Redis sidecar container Note: This approach provides local caching within the Pod, reducing external network calls and improving performance. It's important to consider potential data consistency issues if multiple Pods share the same Redis instance.
NEW QUESTION # 34
You are running a web application in a Kubernetes cluster. You have a deployment named 'web- app' with two replicas. You need to implement a Network Policy that allows only traffic from pods with the label app: database' to access the 'web-app' deployment on port 8080. You also need to block all other traffic to the 'web-app' deployment.
Answer:
Explanation:
See the solution below with Step by Step Explanation.
Explanation:
Solution (Step by Step) :
1. Create the Network Policy:
- Create a YAML file named 'web-app-network-policy.yamr with the following content:
2. Apply the Network Policy: - Apply the Network Policy to your cluster: bash kubectl apply -f web-app-network-policy.yaml 3. Verify the Network Policy: - Verify that the Network Policy has been applied correctly by listing the Network Policies in your namespace: bash kubectl get networkpolicies -n default # Replace with your namespace You should see the 'web-app-network-policy' listed. 4. Test the Network Policy: - From a pod with the label 'app: database' , try to access the 'web-app' deployment on port 8080. This should be successful. - From any other pod, try to access the 'web-app' deployment on port 8080. This should be blocked. - The 'podSelector' in the Network Policy specifies that it applies to pods with the label 'app: web-app'. - The 'ingress' section defines the allowed incoming traffic. In this case, it allows traffic from pods with the label 'app: database' on port 8080. - The 'egress' section defines the allowed outgoing traffic. In this case, it allows all outgoing traffic except on port 8080. This ensures that only pods with the 'app: database' label can access the 'web-ap$ deployment on port 8080. Note: - You may need to update the 'namespace' in the Network Policy YAML file to match the namespace where your 'web-app' deployment is running. - Make sure that pods with the label 'app: database' are allowed to access the 'web-app' deployment by other means, such as Service or Ingress, if needed.,
NEW QUESTION # 35 
Task
A Deployment named backend-deployment in namespace staging runs a web application on port 8081.
Answer:
Explanation:
See the solution below.
Explanation:
Solution:


NEW QUESTION # 36
You have a Kubernetes cluster with a namespace called 'dev' and a deployment named 'app-deployment' in that namespace. You need to create a new Role that allows users in the 'developers' group to only scale the Sapp-deployment' deployment. They should not be able to access any other resources in the 'dev' namespace. Implement the RBAC configuration for this scenario.
Answer:
Explanation:
See the solution below with Step by Step Explanation.
Explanation:
Solution (Step by Step) :
1. Create a Role:
- Create a YAML file named 'scale-app-role.yaml' with the following content:
2. Create a RoleBinding: - Create a YAML file named 'scale-app-rolebinding.yaml' with the following content:
3. Apply the configuration: - Apply the Role and Role8inding using the following commands: bash kubectl apply -f scale-app-role.yaml kubectl apply -f scale-app-rolebinding-yaml 4. Verify the configuration: - You can verify the configuration by using the following command: bash kubectl auth can-i --list --as=user:testuser--group-developers--namespace-dev - Replace 'testuser' with the name of a user in the 'developers' group. The output should show only the following permissions: - 'apps/deployments': 'get, "list, 'watch', 'update', 'patch', 'scale' 5. Test the permissions: - Try to scale the Sapp-deployment deployment using the 'kubectr command as a user in the 'developers group. - Try to perform other actions on the deployment or other resources in the 'devs namespace. You should only be able to scale the Sapp-deployment deployment.
NEW QUESTION # 37 
Task
A deployment is falling on the cluster due to an incorrect image being specified. Locate the deployment, and fix the problem.
Answer:
Explanation:
See the solution below
Explanation:
create deploy hello-deploy --image=nginx --dry-run=client -o yaml > hello-deploy.yaml Update deployment image to nginx:1.17.4: kubectl set image deploy/hello-deploy nginx=nginx:1.17.4
NEW QUESTION # 38
You are deploying a new application named 'streaming-services that requires 7 replicas. You want to implement a rolling update strategy that allows for a maximum of two pods to be unavailable at any given time. However, you need to ensure that the update process is triggered automatically whenever a new image is pusned to the Docker Hub repository 'streaming/streaming-service:latest'.
Answer:
Explanation:
See the solution below with Step by Step Explanation.
Explanation:
Solution (Step by Step) :
I). Update the Deployment YAMI-:
- Update the 'replicas' to 7.
- Define 'maxunavailable: 2" and 'maxSurge: (Y in the 'strategy.rollingUpdate' section.
- Configure a 'strategy.types to 'Rollingl_lpdates to trigger a rolling update when the deployment is updated.
- Add a 'spec-template.spec.imagePullPolicy: Always' to ensure that the new image is pulled even if it exists in the pod's local cache.
2. Create the Deployment: - Apply the updated YAML file using 'kubectl apply -f streaming-service-deployment-yamr 3. Verify the Deployment - Check the status of the deployment using 'kubectl get deployments streaming-service-deployment to confirm the rollout and updated replica count. 4. Trigger the Automatic Update: - Push a new image to the 'streaming/streaming-service:latest' Docker Hub repository. 5. Monitor the Deployment - Use 'kubectl get pods -l app=streaming-service' to monitor the pod updates during the rolling update process. You will observe that two pods are terminated at a time, while two new with the updated image are created. 6. Check for Successful Update: - Once the deployment is complete, use 'kubectl describe deployment streaming-service-deployment' to see that the 'updatedReplicas' field matches the 'replicas' field, indicating a successful update.
NEW QUESTION # 39
You have a web application that uses two different services: 'frontend' and 'backend'. You want to restrict access to the 'backend' service from all pods except those with the label 'app: frontend'. How would you configure NetworkPolicy to achieve this?
Answer:
Explanation:
See the solution below with Step by Step Explanation.
Explanation:
- Replace with your actual namespace. 2. Apply the NetworkPolicy: - Run the following command to apply the NetworkPolicy: bash kubectl apply -f backend-networkpolicy.yaml - This NetworkPolicy defines a policy for pods with the label 'app: backend'. - The 'ingress' rule allows traffic only from pods with the label 'app: frontend'. - All other pods will be blocked from accessing the 'backend' service. This ensures that only the frontend' service can communicate with the 'backend' service. ,
NEW QUESTION # 40
You have a Deployment running a microservice that is responsible for processing user data To ensure the security of this data, you need to implement a NetworkPolicy that restricts network traffic to and from the microservice's pods.
Answer:
Explanation:
See the solution below with Step by Step Explanation.
Explanation:
Solution (Step by Step) :
1. Create a NetworkP01icy:
- Create a NetworkPolicy YAML file to define the traffic rules:
2. Apply the NetworkPolicy: - Apply tne NetworkPoliCY configuration to your Kubernetes cluster: basn kubectl apply -f restrict-microservice-traffic_yaml 3. Test the NetworkPoIicy: - Create a pod in a different namespace or on a different node. - Attempt to connect to the microservice pod from the new pod. - Verity that the connection is blocked as per the defined NetworkPolicy rules.
NEW QUESTION # 41
You have a web application that requires a dedicated load balancer to handle incoming traffic and distribute requests across multiple pods- HOW can you set up a dedicated load balancer in Kubernetes using a 'Services and Ingress?
Answer:
Explanation:
See the solution below with Step by Step Explanation.
Explanation:
Solution (Step by Step) :
1. Create a Deployment:
- Create a 'Deployment for your web application.
- Specify the number of replicas, image, and any other necessary configuration.
2. Define a Service: - Create a 'service' to expose your 'Deployment' and provide a load balancing endpoint. - Specify the 'selector to match the labels of your pods and use 'type: Load8alancer' to request a dedicated load balancer from your cloud provider.
3. Configure an Ingress: - Create an 'Ingress' Object to handle incoming traffic and route it to the correct service. - Specify the 'hostname' for your web application and the 'backend' service to which the requests should be forwarded.
4. Apply the Configuration: - Apply the 'Deployment', 'service', and 'Ingress' definitions using 'kubectl apply' or 'kubectl create' 5. Access Your Application: - Once the 'Ingress' is configured, you can access your web application using the specified hostname (e.g., 'my-web-app-example.com'). The load balancer will distribute tne traffic across the available pods of your web application. Note: The 'type: LoadBalancer' service will create a dedicated load balancer in your cloud provider, which will be accessible through an external IP address. The 'Ingress' object will map the hostname to this load balancer, routing traffic to your web application pods.
NEW QUESTION # 42
You are tasked with setting up a secure Kubernetes cluster for a web application. The application has sensitive data that must be protected. You need to configure a mecnanism to restrict access to the application's pods based on user identities. Describe a method to achieve this using Kubernetes RBAC and Service Accounts, ensuring that only authorized users can access specific pods.
Answer:
Explanation:
See the solution below with Step by Step Explanation.
Explanation:
Solution (Step by Step) :
1. Create a Service Account
- Create a Service Account for the application:
- Apply the Service Account configuratiom basn kubectl apply -f webapp-sa.yaml 2. Create a Role: - Define a Role that grants access to the specific pods:
- Apply the Role configuratiom bash kubectl apply -f webapp-pod-reader.yaml 3. Create a RoleBinding: - Bind the Role to the Service Account
- Apply the RoleBinding configuration: bash kubectl apply -f webapp-pod-reader-binding_yaml 4. Configure the Application: - When deploying the application, specify the Service Account:
5. Verify Access: - Use the 'kubectr command with the Service Account's credentials to verify that only authorized users can access the application's pods: bash kubectl -service-account=webapp-sa get pods -n This setup utilizes Kubernetes RBAC to control access to the application's pods. - The Service Account acts as an identity for the application. - The Role defines the permissions granted to the Service Account, specifically allowing access to the pods. - The RoleBinding associates the Role with the Service Account, linking the permissions to the identity. - When the application is deployed witn tne specified Service Account, it inherits the permissions defined in the RoleBinding. This ensures that only users with the necessary credentials (associated with the Service Account) can access and interact with the application's pods, safeguarding sensitive data.
NEW QUESTION # 43
......
How does Kubernetes work?
Kubernetes is an open-source software application designed for managing containers, also called containers. Devices can be co-located or on separate physical or virtual machines. In a single cluster, the Kubernetes master schedules containers on the worker nodes. Container software will let you package your application with all of its dependencies into a single image that can run on any Linux server. Introduced in May 2014, Kubernetes was designed and built at Google, and it has been fully open-sourced. The idea behind containers is that you can take an application and wrap it into a complete environment and ship it and run it on any other machine. Ingress ports are TCP ports 80, 443, and 53. Exchange services are for communication between services. Exchange sub-services are sub-services that are accessed by proxies. CNCF CKAD Dumps is perfect for you if you are working on Kubernetes in any capacity, be it in the development team, or in the support team. Respective ports are distributed amongst the nodes by Kubernetes and load balanced.
You can use Kubernetes to create container clusters and manage your applications. Exponentially scalable. Customer logs in to a web portal and they're shown a dashboard of their containers. Special scales and distribution of traffic and load are managed by Kubernetes. Valid connections are rejected by the ingress controller. Authentic Traffic is sent via a network tunnel to a proxy container, which passes the traffic on to the appropriate service. Hired by, or open-source. Open source for the core Kubernetes features and tool chain. Yields a Kubernetes cluster. You can imagine a Kubernetes cluster as a collection of nodes. Downloads the configuration.
Updated CKAD Dumps Questions For Linux Foundation Exam: https://www.examcollectionpass.com/Linux-Foundation/CKAD-practice-exam-dumps.html
UPDATED Linux Foundation CKAD Exam Questions & Answer: https://drive.google.com/open?id=1XLTZ38pgNGyzr8G8kvAwZMPp9YUqPNYz